How to insert AdMob Banner Ad in your Android App
Banner Ad is one of the Ad types of AdMob which helps you in generating revenue by displaying Ads on your App. This guide shows you how to integrate banner ads from AdMob into an Android app.
I use the sample app id and banner id for the test. Because if we use read ids for tests AdMob will ban our account. So always use sample ad codes for tests. After all codes and apps are modified/developed you can place AdMob real ids.
Integrate AdMob Banner ads in Android App
To do that please follow the instructions.

How to insert AdMob Banner Ad in your Android App.

1. in build.gradle(:app) add following code.
implementation 'com.google.android.gms:play-services-ads:20.1.0'
2. Now click on Sync now.
3. in AndroidManifest.xml add this meta tag.
<meta-data
android:name="com.google.android.gms.ads.APPLICATION_ID"
android:value="ca-app-pub-3940256099942544~3347511713"
/>
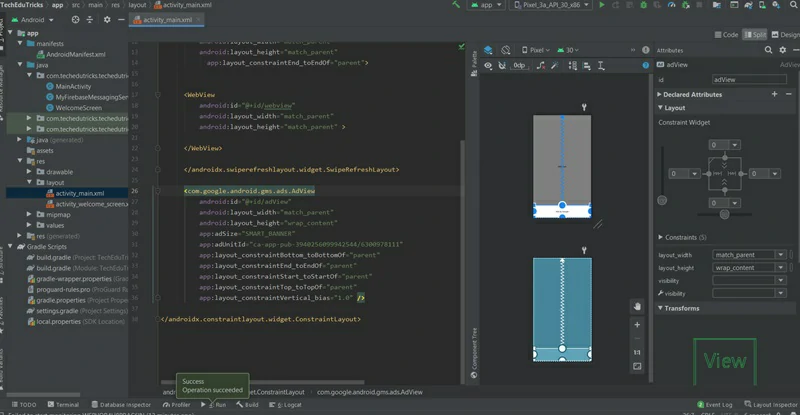
4. Now open your activity_main.xml layout. Then add the following code.
<com.google.android.gms.ads.AdView
android:id="@+id/adView"
android:layout_width="match_parent"
android:layout_height="wrap_content"
app:adSize="SMART_BANNER"
app:adUnitId="ca-app-pub-3940256099942544/6300978111"
app:layout_constraintBottom_toBottomOf="parent"
app:layout_constraintEnd_toEndOf="parent"
app:layout_constraintStart_toStartOf="parent"
app:layout_constraintTop_toTopOf="parent"
app:layout_constraintVertical_bias="1.0" />
We use ad size for SMART_BANNER because it fits the screen and better experience.
5. in MainActivity.java add the following code inside oncreate method.
MobileAds.initialize(this, initializationStatus -> {
});

AdView mAdView = (AdView) findViewById(R.id.adView);
AdRequest adRequest = new AdRequest.Builder().build();
mAdView.loadAd(adRequest);
6. Now run your application. if you get an error like this “Cannot fit requested classes in a single dex file” add the following code in build.gradle(:app).
multiDexEnabled true
7. Then add this code in dependencies.
implementation 'com.android.support:multidex:1.0.3'
Here is the full code – build.gradle(:app)
plugins {
id 'com.android.application'
id 'com.google.gms.google-services'
}

android {
compileSdkVersion 30
buildToolsVersion "30.0.3"

defaultConfig {
applicationId "com.techedutricks.techedutricks"
minSdkVersion 17
targetSdkVersion 30
versionCode 1
versionName "1.0"
multiDexEnabled true

testInstrumentationRunner "androidx.test.runner.AndroidJUnitRunner"
}

buildTypes {
release {
minifyEnabled false
proguardFiles getDefaultProguardFile('proguard-android-optimize.txt'), 'proguard-rules.pro'
}
}
compileOptions {
sourceCompatibility JavaVersion.VERSION_1_8
targetCompatibility JavaVersion.VERSION_1_8
}
}

dependencies {

implementation 'androidx.appcompat:appcompat:1.3.0'
implementation 'com.google.android.material:material:1.3.0'
implementation 'androidx.constraintlayout:constraintlayout:2.0.4'
implementation('androidx.swiperefreshlayout:swiperefreshlayout:1.1.0')
implementation 'com.google.firebase:firebase-messaging:22.0.0'
implementation 'com.google.android.gms:play-services-ads:20.1.0'
implementation 'com.android.support:multidex:1.0.3'
testImplementation 'junit:junit:4.13.2'
androidTestImplementation 'androidx.test.ext:junit:1.1.2'
androidTestImplementation 'androidx.test.espresso:espresso-core:3.3.0'
implementation platform('com.google.firebase:firebase-bom:28.0.1')
implementation 'com.google.firebase:firebase-analytics'
}
apply plugin: 'com.google.gms.google-services'
Now, all done. If you have any problems please comment below. And also share your ideas with us!!


