How to set up Cloudflare for Your WordPress Site?
Why Cloudflare?
Cloudflare is one of the best WordPress CDN and firewall services available in the market. They offer a free CDN that speeds up your website along with a suite of powerful security features for small business websites.
- Secure your websites, APIs, and Internet applications.
- Protect corporate networks, employees, and devices.
- Write and deploy code that runs on the network edge
Should I use Cloudflare?
Along with the caching and CDN, Cloudflare helps protect your site against brute-force attacks and threats against your website. Cloudflare has the advantage of serving over 12 million websites and so can identify malicious bots and users more easily than any operating system firewall.
How to set up Cloudflare for Your WordPress Site?
Cloudflare is a free content delivery network (CDN) and security service. Once you connect your WordPress site to Cloudflare, you’ll be able to speed up your site with the CDN, secure it with SSL and bot protection, and implement some other useful features. In this Cloudflare for WordPress tutorial, you’ll learn how to, Set up your WordPress site with Cloudflare and speed up your WordPress site.
How to Install Cloudflare on Your WordPress Site?
Before you can start configuring the other options in Cloudflare, you need to create a Cloudflare account then you can connect your site to Cloudflare.
1. Create your free Cloudflare account
To get started, go to Cloudflare and sign up.
On the next page, enter the domain name of the WordPress site that you want to use with Cloudflare and click Add site:
Next, you’ll be prompted to choose a plan. You can choose the Free plan for now, as it offers all the features most WordPress sites need:
2. Verify DNS records
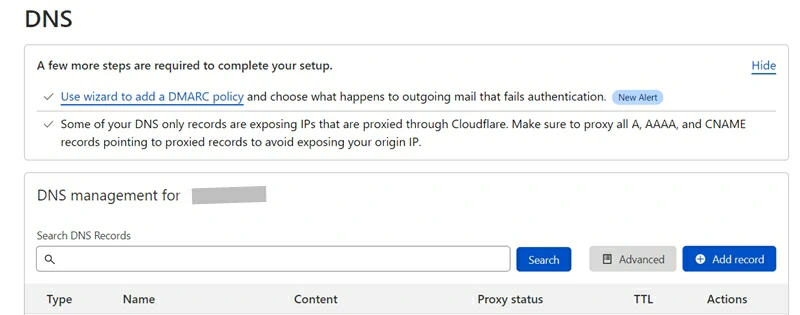

Once you choose your plan, Cloudflare will scan your site’s DNS records.
After that, click Continue.
3. Update nameservers to point towards Cloudflare
Now, Cloudflare will give you a new set of nameservers to replace your existing nameservers:
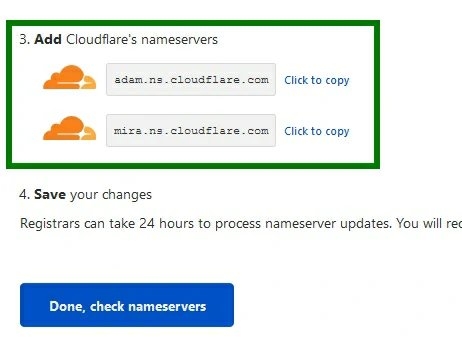

Nameservers are part of what you use to connect your domain name to your web hosting. When you switch to Cloudflare’s nameservers, Cloudflare is able to direct traffic to your website. So that they can secure your site from malicious traffic.
How you will change your nameservers depends on where you registered your domain name. Here is a tutorial for Namecheap domain name registrars.
Namecheap (Setup Cloudflare on Namecheap)


- Log in to your account.
- Choose the domain you want to connect for Cloudflare.
- Click on Manage.
- Now in the Nameservers tab change it to “Custom DNS“. Then you can add Cloudflare DNS records.
Once you’ve changed your domain’s nameservers, go back to the Cloudflare interface and click the Done, check nameservers button.
Note: nameservers can take up to 24 hours to update, so you might need to wait a bit for Cloudflare to update. Don’t panic and think you made a mistake unless it’s been at least 24 hours.
5. Verify that your connection is complete
Once you click Done, you might see a message telling you that you need to complete your nameserver setup:
Again – don’t panic. Nameservers can take up to 24 hours to update, so it’s totally normal to see this message for a few hours even if you did everything correctly.
Wait 30 minutes to an hour and then click the Re-check now button to see if the nameservers have updated.
Once they do, you should see a success message:


Now your site is connected with Cloudflare.
If you want to install the Cloudflare plugin also, you can but it’s not really needed. However, the plugin helps with two things:
- It automatically configures some of the most important settings to optimize how your WordPress site works with Cloudflare.
- It lets you manage some important Cloudflare settings from your WordPress dashboard, rather than needing to use the Cloudflare website.
Read also: What is the Best Hosting Service?
